Using O2 Pay As You Go broadband dongle under Ubuntu Netbook Remix
Introduction
This is a step-by-step guide to getting
an O2 Pay As You Go mobile broadband dongle working under Ubuntu
Netbook Remix. Install should be as simple as plugging in the device
and selecting the provider. Unfortunately the configuration settings
for O2 appear to have changed and so it now needs a few changes to
the settings before it will connect.
The configuration of other Ubuntu /
Gnome based distributions will be very similar although it may look
slightly different to the screenshots provided.
The setting information is specific to
O2, but the process will be the same if using a different provider.
This may also change with different versions of the broadband dongle
and/or updated service offerings. The specific version used is the
Huawei
E160 purchased during 2009.
Hardware support and detection
The hardware consists of an
external USB dongle with SIM card. This can be plugged into a
suitable USB port and is auto-detected. There is no specific driver
for the E160 but it is instead detected as a Huawei Technologies E220
/ E270 HSDPA/HSUPA Modem which works fine. It is common for hardware
manufacturers to make small changes to the dongles, but if it is
based on the same basic chipset then it will normally still work.
Ubuntu Netbook Remix has a
short wizard which will set-up using the default settings. This is
done by simply selecting the local country “Britain”,
provider and broadband plan (using Prepaid for pay as you go). If
this works then feel free to continue, but most likely this will
provide the now out-of-date settings that do not work with the newer
model dongles.
Configuring Network Settings
To configure the broadband modem
settings choose the Network Connections application from the System
menu.

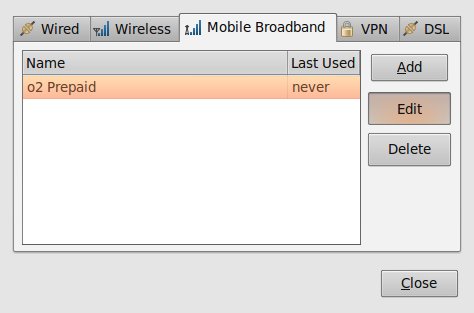
Choose the “Mobile broadband”
tab.

If you have already tried the wizard
then it will display o2 Prepaid in the form. Select this and choose
edit.
If not then click Add to create a new
profile.
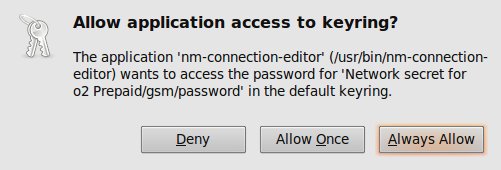
You will be asked if you would like to
provide access to the keyring. This is a security feature of Ubuntu
where password settings are stored on a secure keyring which you can
protect with a password. I selected Always Allow, but you could just
Allow Once if you preferred to have to approve each time you make a
configuration change.

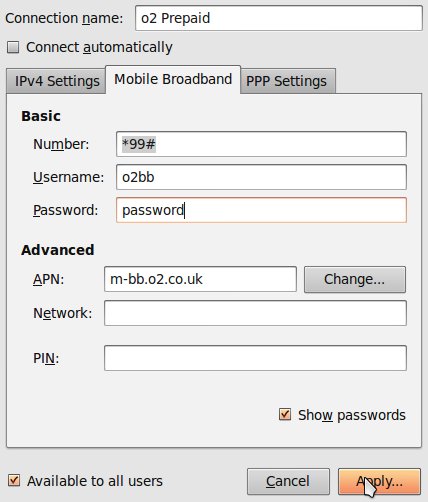
You are now presented at the
configuration page which allows the settings to be entered.

Details should be entered as follows:
Number: *99# (this is the virtual phone
number that the dongle connects to)
Username: o2bb (this is the generic
username for the O2 mobile broadband)
Password: password (enter the word
“password”. This is a generic password)
APN: m-bb.o2.co.uk (this is the APN
address for o2 broadband)
Network: (leave blank)
PIN: (leave blank unless you have
manually added a PIN to the SIM)
Show passwords (optional) – this
is selected in the screen-shot to allow the password to be shown. If
unchecked then the password field will show * characters instead.
Available to all users: Tick (this
appears to be required even if you only use the same login as used to
configure the settings).
Note that this is the part that is
specific to O2. For other providers then details will need to be
obtained from the service provider.
These settings were found from the Mac
instruction manual provided for the broadband dongle, you can also
find the configuration details for some providers through Google.
Apply these settings and the
configuration is now complete. You can now close the configuration
application.
Connecting to the Network
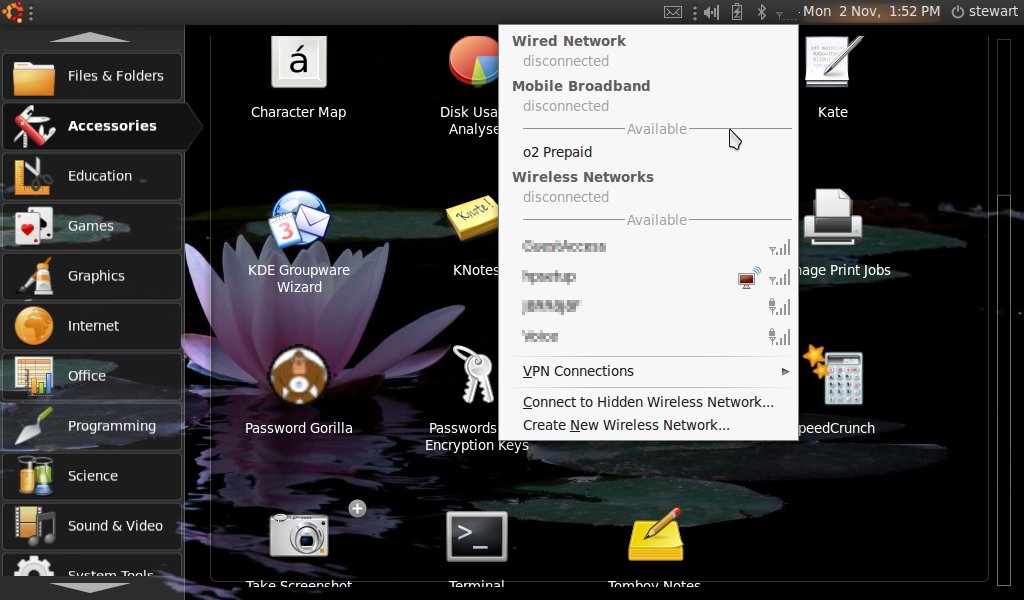
Once the configuration is complete connecting is as simple as
choosing the network icon in the system tray and choosing “o2
Prepaid”.
This is the small aerial icon located to the left of the time and
date. The icon may look slightly different depending upon the Theme
chosen, but should still be recognisable as such (also note that
depending upon your hardware you may not have the bluetooth icon
which is shown immediately to the left of the networking icon on my
system).

Assuming there is a suitable service
in your area it should then connect to the network. In a 3G area this
will be at broadband speeds (eg. 2Mb). If there is no 3G signal, but
there is a mobile phone signal then the speed will be much slower
(9.6kb – for GSM). This is painfully slow – although O2
does appear to provide a basic level of image compression which helps
slightly.
Further Reading
Hardware
review O2 Mobile Broadband (Huawei E160 USB Dongle)
Earlier
less detailed mini-tutorial configuration O2 Mobile Broadband for
Ubuntu
