Disco Lights controlled by a Micro:Bit running Micro Python
I’ve been playing around with a BBC Micro:Bit for the last few days. You can see my first adventures in programming MicroPython on the Micro:Bit using a Raspberry Pi 2.
One of the first things that you normally do when learning electronics is to light up an LED. It gives an immediate output and adds a bit of a wow factor as the student feels they’ve accomplished something. All well and good, but a little red LED is not that impressive. So I thought what about a bigger LED, what above a bright LED would that be a bit more impressive? What if they were mini-theatre lights bright enough to make an impact at your school disco!
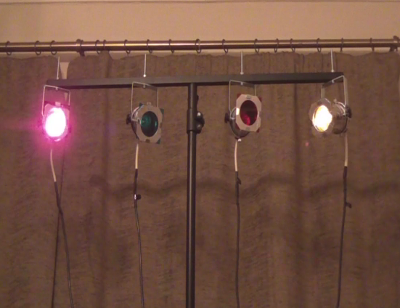
Here they are – PAR16 mini-theatre lights controlled by a Micro:Bit.
Warning
A quick word of warning. If you create this the way that I have then these are pretty safe, but if you try and do something silly (like use mains powered lights) then you could cause serious injury or cause a fire.
- Do NOT use mains voltage lights – PAR 16 lights are available in two types. The one I used is designed for low voltage (12v) bulbs. Do NOT attempt this with ones designed for mains voltages (eg. 110V or 230V).
- Use LED bulbs – I used 12V MR16 LED bulbs. These use the same connection as halogen bulbs, but take a lot less current. If you use halogen bulbs then you need to take additional precautions due to the current and the heat generated – so I recommend only using LED bulbs of around 5 Watts or less. Also check that the LED bulbs work with DC.
- Make sure that the power supply is safe – It should be the correct voltage – 12V output, DC (not AC) and enough current for all the LEDS you will use at once. Assuming 5W LEDs then a 12V 5Amp DC power supply would easily cope with 8 Lights. Make sure it complies with local country safety regulations (eg. CE or FCC) and includes short circuit and overheating protection.
Video of Disco Lights in action
Circuit
Below is the circuit showing one of the connections (on PIN 2). This would be repeated for each light.
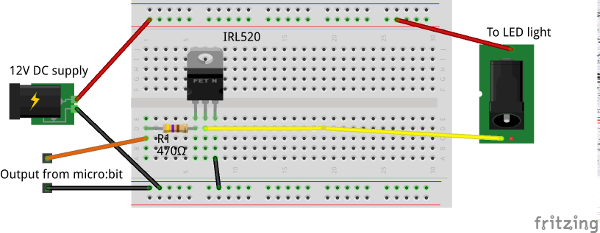
There are 3 connectors on the micro:bit that can be connected directly using crocodile clips. If you need more than 3 lights then you will need to use a microbit breakout board to access more of the pins on the micro:bit. The breakout board is also included in the micro:bit inventors kit.
MicroPython code
The following is the code to make 4 lights flash in sequence. This uses pins 0 to 2 which are the ones that can be connected using a crocodile clip and pin 3 which is the left-most connector on the edge connector. You will likely need a breakout board to access that connection.
To use just three lights then you can delete the lines referring to pin 3.
from microbit import *

while True:
    pin0.write_digital(1)
    pin1.write_digital(0)
    pin2.write_digital(0)
    pin3.write_digital(0)
    sleep(500)
    pin0.write_digital(0)
    pin1.write_digital(1)
    pin2.write_digital(0)
    pin3.write_digital(0)
    sleep(500)
    pin0.write_digital(0)
    pin1.write_digital(0)
    pin2.write_digital(1)
    pin3.write_digital(0)
    sleep(500)
    pin0.write_digital(0)
    pin1.write_digital(0)
    pin2.write_digital(0)
    pin3.write_digital(1)
    sleep(500)
Note that this code is pretty long for just turning for lights on and off – imagine if there were 8 lights instead. Can you think of a way to simplify it?
Summary
This is a simple circuit that can have a big impact. The code is very basic and there are lots of ways it can be improved and to add different sequences etc. A good point to start experimenting.