Upgrading Thunderbird email client to version 3 on Linux (Ubuntu 9.10)
There is a new version of the Thunderbird email client released last year. There are some good new features in the new version. If you can’t wait until your distribution provides an upgrade to version 3 you can download the latest version from the Thunderbird website. There does not appear to be any instructions on how to keep your existing profile. These are the steps that I followed to install it under Ubuntu linux.

The following can be used to upgrade from Thunderbird 2 to Thunderbird 3 on Linux. This has been tested using Ubuntu, but should be the same on other distributions.
Preparation work
Before the upgrade you need to locate the folder with the current profile. The folder containing the profile uses a random string of letters as a security feature to make it harder for viruses and malicious software to access files within the profile. As the new install of Thunderbird will try creating a new profile we instead need to identify the directory and set it to use the existing directory instead.
You can try finding this by looking in the .mozilla-thunderbird directory which is where it is installed on Ubuntu. Under version 3 this directory has changed to .thunderbird by default.
ls ~/.mozilla-thunderbird directory
There will be a folder named with a random string of letters followed by .profile
(eg. rs83i27n.profile)
You can also see the folder in Thunderbird in the “Account Settings” under “Server Settings” and then “Local Directory”. You should only use up to the ????????.profile folder.
Download the new version
You can download the new version from the Thunderbird website. Save it into the home directory.
Install into the /opt directory
I installed into the /opt directory to keep the new install seperate from the official packages.
cd /opt
sudo tar -xjvf ~/thunderbird-3.0.tar.bz2
Set the profile to the existing directory
By default Thunderbird will generate a new folder, but instead you can set it to the existing folder instead.
First run Thunderbird with the ProfileManager option.
/opt/thunderbird/thunderbird -ProfileManager
choose “Create Profile”
When creating the profile use “choose folder” and enter the profile directory established above.
You can now start Thunderbird using
/opt/thunderbird/thunderbird
although instead we will add it to the start menu.
An alternative to using the -ProfileManager option is to run Thunderbird and then copy the profile directory over the new profile directory created automatically.
Create launch icon
Remove the old version of thunderbird using
sudo apt-get remove thunderbird
Alternatively remove the existing client using whatever Add/Remove tool is provided within your distribution.
Thunderbird 3 can be added to the start menu using
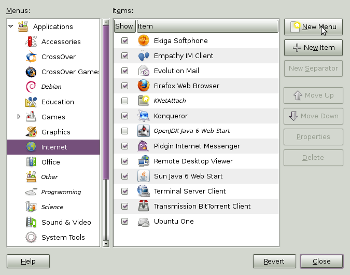
System -> Preferences -> Main Menu

Then fill in the details as per the screenshot below.
The icons are located in /opt/thunderbird/chrome/icons/default/

Final thoughts
There are a few things to be aware of when installing in this method.
The default email client on Ubuntu is Evolution rather than Thunderbird. Although it may be possible to copy the data over from Evolution to Thunderbird I have not looked into that for this upgrade. This upgrade assumes a Thunderbird to Thunderbird upgrade.
Installing outside of the normal package manager means it will not be included in the automatic updates handled by the operating systems. You should periodically check on updates to the client through the website or mailing list as appropriate.
This is not an official process. Unfortunately the web site does not provide details of how data should be migrated in Ubuntu and so much of this was by trial and error. I’ve used both the -profilemanager and manually copying the profiles over on different Ubuntu / UNR laptops and they appear to have worked fine. The process on Windows is simpler as it picked the existing profile directory automatically and I would expect any official Ubuntu upgrades to do the same.
There is a bit of effort involved in upgrading at the moment, but the new features are worth having and it is worth doing.
