Networking challenge quiz for school IT and computing fair
In the UK, Year 9 (age 13 to 14) is an important stage which can influence the student’s future career. It is during this year that the students first decide on what subjects to pursue, and in particular whether they will continue to study computer science. I recently attended a computing and IT careers fair for a local school where technology companies and universities were on hand to explain to students what it’s like to study and work in those fields.
I work for a communications company and rather than stand there and talk about working in IT, I created a short hands on networking challenge for the students to interact with. This involved a short multiple-choice quiz on computer networking loosely based around the computing that is in the computing curriculum.
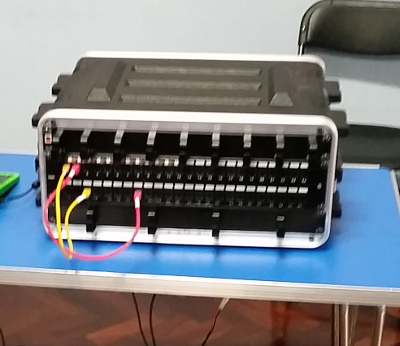
Network patching rack

Instead of answering the questions on paper as they may with a traditional quiz, the students had to connect them up on a patch-panel which would light up green for a correct answer and red for an incorrect answer. As well as interacting with the challenge it gave an opportunity to talk about working in the IT industry and to aspire them to a rewarding career in the field of computing.

The original idea for the patching rack was to wire the ports directly to a Raspberry Pi, but for maximum flexibility and to make sure that I could also detect where a cable has not been connected correctly then it meant that I have to wire up 30 connections (6 questions, 24 possible answers) plus one more for the LEDs (using NeoPixels). This is more than the number of available ports on the Raspberry Pi, whilst it would have been possible to use an I/O expander that would have meant creating a custom circuit. Instead I decided to use an Arduino Mega. The Arduino mega is connected to the Raspberry Pi by a standard USB cable with serial communications over USB used to communicate between the Raspberry Pi and Arduino.
Connecting to the Arduino Mega
The back of the case does look like a bit of a birds nest, but that was due to lack of space within the case; it’s not possible to remove the top or sides, so I had to make the cables long enough to extend out of the case and then push them in along with the Arduino.
The connectors on the Arduino are push-in connectors, but I wanted something a little more secure without having the concern that one of the many connections could come loose. I used a prototyping board with screw terminals. The biggest challenge was trying to line up the pins between the prototyping board and the Arduino, but once connected it worked really well. This was simpler than trying to connect multiple port expanders and also meant that I could offload the work of controlling the NeoPixels to the Arduino.
Source code
The source code for the Arduino and Raspberry Pi is available from github at the link below.
Networking challenge – Raspberry Pi and Arduino Code
At the moment the code is quite basic. It is a non-GUI program which runs on the command line that I controlled using a Pi-Top (Raspberry Pi laptop). The answers to the questions are hard-coded into the Python file. This is fairly easy to edit in the source code, and certainly easier than having to push an update to the Arduino each time it’s updated, but I do hope to replace this with a configuration file in future.
How it went
I thought it went well on the day. I would much rather the pupils have something that they can interact with than just spend the day talking or answering questions. You could see that some of the pupils were generally interested and came over to have a go (despite having to compete with a reaction game on the Army stall next door).
There’s some things I’d like to change for next time in terms of the questions, but I enjoyed it and I hope that they found it useful.
